Fruit Piano with Arduino/Scratch
Fruit Piano with Arduino/Scratch
We have seen many interesting musical applications with Arduino here and there. They are quite fun if you have enough experience with musical instruments, but what if you want to appear better when you don’t have those trained hands?
Scratch comes to the rescue.
Here we combine the quick prototype capabilities of Arduino and rich interactive libraries of Scratch to make the musics a bit more colourful.
System Architecture

The system is quite similar to the one with Firmata in my another article, except that it does not use Firmata. Extending firmata is of course a choice, however a quite expensive one.
In this system, Arduino reports the status of each pin to the Helper App, which bundles the results and send over to Scratch. Scratch listens for changes in the pin values and triggers a sound accordingly when the threshold is exceeded.
Reading the input capacitance from digital pin
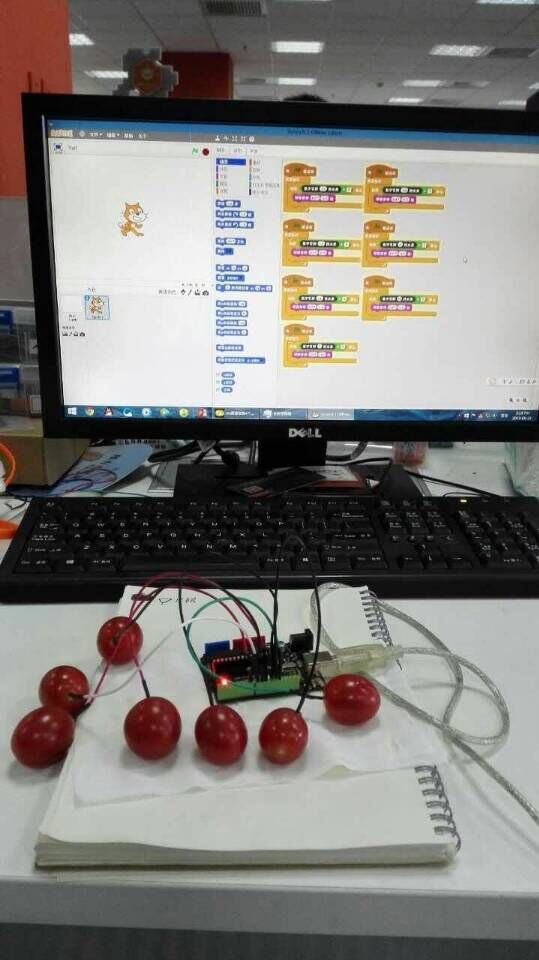
This is essentially witchcraft. You can refer to this post. You can use your finger to test its effect. Or if you have rather dry fingers, you can stick the wire into a piece of rolled-up wet paper tissue to simulate fruit. We surely don’t want to waste food just for testing.
Channel Between Scratch and Arduino
Arduino Code
void setup() {
  // setup Serial port baud rate
  Serial.begin(115200);
}

void loop() {

  // scan every digital pin
  for (int i = 2; i < 14; i++){

    /* Prints out:
    * 2 2
    * 3 2
    * etc.*/
    Serial.print(i);
    Serial.print(" ");
    Serial.print(readCapacitivePin(i));
    Serial.print("\n");

    // no delay causes printing garbage
    delay(10);
  }
}
This code just loops over each pin and report their capacitance readings to the serial port.
Helper App Code
var serialPort = require("serialport");
var http = require("http");

var defaultPort;
// holding the values of each port in a map, updated continuously
var fruits = {};

serialPort.list(function(err, ports) {
    ports.forEach(function(port) {
        // Arduino COM ports usually have the manufacturer name start with "Arduino"
        if (port.manufacturer.toLowerCase().indexOf("arduino") > -1) {
            defaultPort = port.comName;

            var sp = new serialPort.SerialPort(defaultPort, {
                baudrate: 115200 // must match the baud rate in the Arduino sketch code
            });

            sp.on("open", function() {
                sp.on('data', function(data) {
                    var line = data.toString();
                    var lines = line.split("\n"); // split line breaks
                    var columns = line.split(" "); // split pin and reading
                    if (columns.length > 1) { // get rid of bad format
                        var pin = columns[0];
                        var reading = columns[1];
                        reading = reading.replace(/(\r\n|\n|\r)/gm, "");
                        fruits[pin] = reading;
                    }
                    console.dir(fruits);
                });
            });
        }

    });
});

// global http server
var server;
server = http.createServer(function(request, response) {

    // start recording request entry time

    if (request.url != '/poll') { // not poll
        // print non-polling command sent by Scratch

    } else { // Polling

        Object.keys(fruits).forEach(function(pinName) {
        	// prints "capacity/13 2\n", for instance
            response.write("capacity/" + pinName + " " + fruits[pinName] + "\n");
        });

    } // end if

    response.end();
});
server.listen(23456); // HTTP port to listen to
This runs on nodejs. You must have the serialport package installed.
Scratch Extension File
You also need to define your own extension so Scratch can get data from your Helper App.
Write up a text file and call it Fruits.s2e, with below content:
{	"extensionName": "DFRobot",
	"extensionPort": 23456,
	"blockSpecs": [
		["r", "Fruit reading at pin %n","capacity", "13"]
	]
}
the “r” means it is an input block. The “capacity” here is the reading variable identifier and must match the format we send from Nodejs server.
Setting up the Scratch Project
The Chinese is just the translation of “Fruit reading at Pin”. I would advise against printing this on your T-shirt.
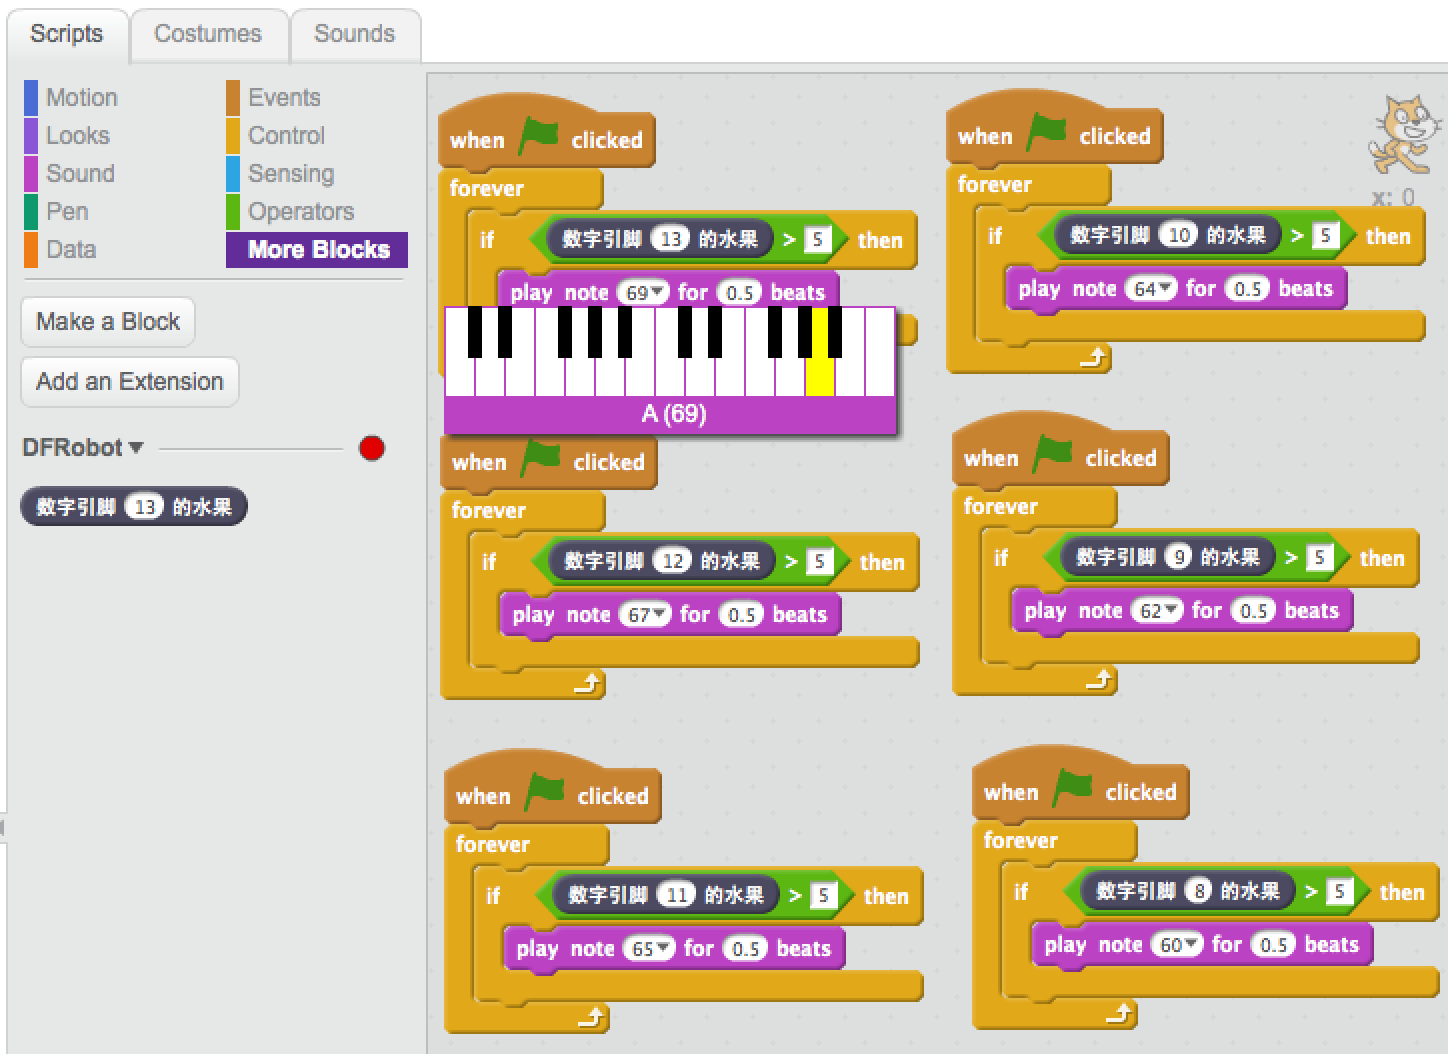
As you can see you can make Scratch to play any sound you like. This example just uses built-in piano tones. You can customise Scratch to play any sound of your choice.
The reason for so many separate blocks is to enable chord, that is touching two pieces of fruit at the same time and play two distinctive notes simultaneously.
Note that attaching fruit to the wires will increase the readings for the capacitance. If your fruit is large, remember to raise the threashold. Here I use 5 because wet paper tissues usually get a reading of 3.
Also don’t let the fruit touch each other. Once they touch each other, the reading will reach maximum for both pins that are attached to fruit.
Demo